A few months ago I sat down to print some prototype BoosterPack parts and I realized that I didn’t have enough filament on hand to finish the job.
Crap, I had like 10 spools sitting around, how did this happen? Unfortunately, no single spool had enough filament leftover to print the large & dense part I needed. The project would have to wait until new material arrived in the mail. Too bad I couldn’t just combine the bits of filament I had leftover. Hmmm…
A little playing around with a lighter, a soldering iron, and various jigs made me realize that it’s actually not easy to splice filament together well. When I was able to get it to stick the bond was always uneven and unreliable.
So why is a good splice so hard to achieve?
- Temperature control is necessary. Burned filament is ruined. If your alignment jig is cold it will steal heat from filament and prevent bonding.
- You can’t push a rope. Heated plastic is squishy and pushing on it makes it mushroom out & eventually bend. Pushing hot filament into a hole is really difficult.
- Jig tolerance issues. A hole for forming a perfect diameter joint is too tight to slide filament into. Also, if plastic hardens inside a molded hole it will be difficult to remove.
- The slinky effect. Filament is stored on spools so it has a curl that makes it difficult to control/align. 3mm diameter is especially unruly
- Geometry: A fused joint is effectively a ‘butt weld’, which is great at resisting normal loads but not so good at bending loads.
3D printing filament doesn’t normally have any fused elements in it. Filament is manufactured all at once in a long continuous strand. The process involves melting pellets into a thick goo and then using a screw to extrude it through a nozzle. Interestingly, the precise diameter of the filament is not controlled by the nozzle diameter but by stretching the warm extruded strand at a controlled speed and cooling in that state. At no time are two ends of filament ever spliced.
The ‘Right’ Way
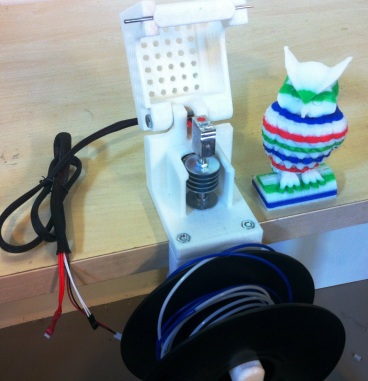
That does not mean it is not possible to do a good splice though. What’s needed is temperature control, guides that aren’t over constraining, and a way to cool the bond that won’t leave you light headed (blowing on it). Guards to keep you from burning yourself are nice too. Something like this thing here:

The New ‘Filament Fuser Block’
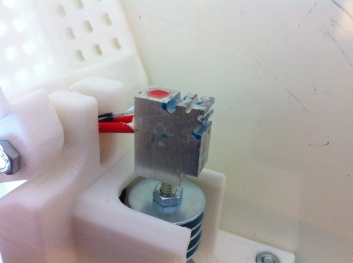
This device uses 3D printed parts to clamp a heated block to the edge of a table. The block has groves for guiding filament together and smoothing the sides, and is precisely temperature controlled by plugging it into your existing 3D printer controller. There is also a fan for isolating the hot block from the mount that doubles as a tool for cooling fresh bonds.
This setup will work on any FDM material and on both common filament diameters. Once you get the technique down its easy to make a multi-colored spool from segments. You can test the effectiveness of the bond by making a few and breaking them intentionally, as I did in my video demo here. If the broken faces have turned white then you’ve done well. I’m sure you already know why 🙂

This is the most effective fuser I’ve been able to come up with, but it is not perfect. There is no cure for the geometry effect mentioned above, so bonds can never be as resistant to bending forces as virgin filament. This means that a fused spool requires some degree more attention to not letting the filament get overstressed and breaking.
Additionally, the fusion process is manual and more color changes require more time spent fusing. For me, multi-color is a neat novelty but the biggest benefit is being able to reduce waste and extend spools to ensure that they have enough filament to complete a long job. So in practice most of my spools will only get a couple splices. Still a useful tool to add to my collection.
It is worth noting that old filament that has absorbed too much water from the air doesn’t splice well in the same way that it doesn’t print well. You can revitalize old filament by putting it in the oven at 200F for half an hour to dry it out or by converting an old food dehydrator into a filament dryer.
Many folks make multi-color parts by pausing their prints midway and replacing the filament then. This method works just fine if you are willing to sit and watch your printer for the right time to switch. But imagine doing that for the ~20 color changes over 3 hours that it took to print the owl! Personally, I like the set-and-forget option this device provides because I print things overnight and while I’m at work during the day.
If you’re interested in trying one of these things out yourself I’ve shared the complete BOM here. I’ve made the 3D printable STL files available for free on Thingiverse here, feel free to modify them if you get any creative ideas! Assembly and use instructions are available on 3Dprinting.com here.
Edit: I’ve discovered that squeezing a freshly made warm joint with grooved pliers as it cools helps compact it and noticeably strengthens the bond. I designed a set of printable covers that fits standard 6″ slip joint pliers. STL file now included with rest!

Groovy Baby

Consider it fused
Have you since come up with a controller design for the block other than plugging in to the base of the printer? If I may suggest Jason Kits on Tindie makes a stand alone controller. It comes to you raw on PCB but he does have and enclosure available. https://www.tindie.com/products/JasonKits/3d-printer-filament-joinerfuser-pid-controller-/. Takes little while to get them in. The price was on par with me building a design myself or using a separate controller. Still requires a 12volt power supply. That way if you are running towards the end of you roll you can splice on the fly.
LikeLike