It should come as no surprise that I immediately deviated from my stated test plan and started using TestrBot to learn about the thing I was most curious about: The effect of solvent treatments on the mechanical strength 3D printed ABS plastic parts.
Acetone is a powerful solvent and when it is applied to ABS plastic the result is similar to what happens when you pour water onto a sugar cube. When the solvent is applied sparingly it will dissolve only the outer surface resulting in a smooth & shiny finish. Vapor polishing is nothing new, people have been doing this for years.
The general assumption held by most people up to this point is that exposing an ABS plastic part to acetone would increase its strength because the smoothed surface would have fewer print lines and micro-cracks (which cause stress concentrations).
But if you’ve been following my work then you know that I’m not one to rely on anecdotal experience, so I setup a little experiment.

And then my little experiment turned into a big one.
I also wasn’t content to use the established methods of applying acetone to the printed parts. The current vapor polishing techniques and their drawbacks include:
- Hot treat via boiling solvent in a crock pot or similar chamber. This presents both fume & fire hazards and doing it is a very hands-on process.
- Cold treat via slow release of solvent from paper towels in an enclosed container. This method is excessively time consuming and you can’t observe parts during the process.
- Spray canned solvent aerosol onto part which produces an inconsistent surface finish and must be done outside.
- Dipping parts directly into liquid solvents which creates an unpredictable/inconsistent finish and will likely over expose smaller portions of the part.
What I wanted is a device with the convenience of a kitchen microwave. Something safe that I can use indoors that will produce a repeatable result without a bunch of hassle. What I ended up building is an Ultrasonic Misting 3D Print Vapor Polisher, and I’ve created an instructable on how you can build one too!
This is the device I used to prepare the specimens prior to testing, as seen in this video:
Test Results:
I concluded that treating abs specimens with acetone vapor caused them to lose strength, despite having given the specimens a full 24 hours to dry out. Curious folks can check out the pdf file for detailed test results here: Acetone Vapor Test Results
This result was surprising. My somewhat speculative explanation for the resulting loss of strength is that the exposure to the solvent caused a permanent chemical change to the surface of the parts resulting in a softening effect which negated the positive effects of the reduced stress concentrations.
Looking at the inside of the parts and it is clear that the treatment did not penetrate very deep. It is interesting to note that the mass of the specimens was measured before and after treatment and right before they were tested; Specimens increased in mass by about 0.2 grams right after the treatment but they went back to their normal weight within 24 hours.
To be fair, this was not an exhaustive study. I tested a handful of specimens in a single orientation. But then again, my standard deviations were low so my experimental results are clearly repeatable.
All things considered, having an ultrasonic vapor treatment chamber could still be beneficial to anyone wanting to improve the aesthetic value of their 3D printed parts.
EDIT UPDATE: 7-4-16
I recently released an updated cleaned up version of this device, and to go with it I performed a dozen more tests on vapor polished parts.

Fully Automated Ultrasonic Vapor Polisher
I 3D printed ABS specimens in two different orientations, treated half of them with acetone, and broke them on the Testrbot to see how the orientation and acetone affected the printed parts.
The results were very interesting! (complete report here)
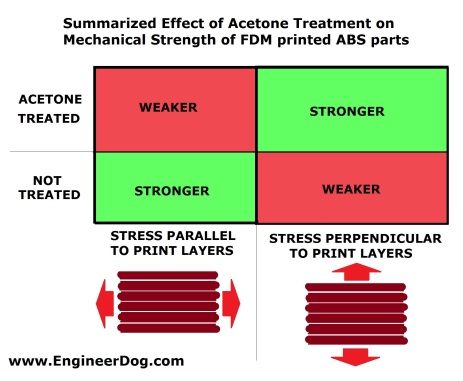
The new testing shows that acetone treatment has two measurable opposing effects on ABS FDM 3D printed parts:
1) A chemical weakening of the material structure
2) A mechanical strengthening of layer bonds via the reduction of surface stress concentrations. (This effect was anticipated but up until now it was never tested for.)
This testing has shown that effect #1 outweighs effect #2 to decrease the part strength by 9% in all stress conditions other than Z-axis loads, in which effect #2 outweighs effect #1 to increase the part strength by 31%.
Regarding effect #1, these new results agree with previous testing done in effect but not in magnitude. My hypothesis is that the additional drying time that I gave the new specimens helped remove all traces of acetone which may have contributed to additional softening of the specimens in the previous testing.
The overall effect of Acetone vapor polishing on ABS effectively makes parts somewhat more isotropic. That is, they react more uniformly to applied loads from various directions. In this case, polishing sacrifices strength in their strong axis to increase strength in their weak axis.

Great work. I’ve been wanting to find time for something like this for a long time, but I’m the king of uncompleted projects. I look forward to seeing your results for other tests.
The general form of the stress-strain curves looks similar to what I’ve seen for tests done on ABS. I read a paper on the effect of annealing 3d printed specimens… apparently it does little if anything.
Your results seem to make sense. It’s been a while since I studied the topic, but aren’t stress concentrations more applicable for fatigue rather than static loading (if loaded to near yielding, the material will give a little, allowing the stresses to realign themselves)? Something like that… as i said, it’s been a while. Besides, the internals (where you noted the effect of the acetone didn’t reach) are still riddled with voids and discontinuities that would still cause stress risers near the surface, so the smoothing wouldn’t much effect. Makes sense that the acetone might potentially mess with the chemistry.
Sorry, a bit of a ramble. Like i said, great work, i look forward to seeing the rest of your results. Meanwhile, i think i need to study up on failure criteria for anisotropic materials. Legitimately excited.
LikeLike
On second thought… i think the terminology lead me off on a tangent. “stress concentrations” as in k values for fatigue stress calcs, my comments stand. But general points of weakness for failure initialion, yes, the rough outer surface presents those, but the effect wouldn’t be as big as a geometric stress concentration.
LikeLike
I’m inclined to agree.The minor surface nicks are probably not going to have a significant effect on the overall static strength, certainly they would not be as significant as something like a large corner or edge designed into the specimen. But those nicks would definitely would be the initiation point for a fatigue failure.
I’ve had some requests to print some specimens vertically and see if the polished finish helps more in that case, so I’m adding that one to my list.
LikeLike
Thanks! There are lots of potential variables at play here and its difficult to accurately predict what will have the largest effect. For instance, there’s the imperfections from this printing method designed right into the parts combined my particular printer’s ability to make these structures as modeled. Those internal voids are definitely a source of unpredictability.
I initially did this entire test with specimens having only one outer shell (instead of 2) so the acetone could get inside, but the parts ended up being stronger on the bottom than the top (because the single top layer didn’t make a perfect cover). The specimens essentially fell over instead of breaking, so the test was inconclusive.
LikeLike
[…] treatment, and was surprised to find that the parts were weaker after the treatment. You can read more about that on his blog and see a video of the vapor polisher after the […]
LikeLike
[…] treatment, and was surprised to find that the parts were weaker after the treatment. You can read more about that on his blog and see a video of the vapor polisher after the […]
LikeLike
[…] treatment, and was surprised to find that the parts were weaker after the treatment. You can read more about that on his blog and see a video of the vapor polisher after the […]
LikeLike
[…] treatment, and was surprised to find that the parts were weaker after the treatment. You can read more about that on his blog and see a video of the vapor polisher after the […]
LikeLike
[…] acetone vapor treatment reduces the strength of ABS plastic parts by a measurable amount; for me it was almost 20 % under bending […]
LikeLike
I like the ultrasonic vapor method. My thinking has always been that vapor polishing would improve the layer bonding. I would be interested to see similar tests performed with a bar that was printed as a tower. In that case, my hypothesis would be that the polished parts are significantly stronger. Also curious if you let the specimens dry for more than 24 hours, do you think that would make a difference?
LikeLiked by 1 person
I would also be curious to see what happens to a tower specimen given more drying time. I think its entirely possible that we’ll see the opposite result in those circumstances, so Ill have to make some time for that one.
LikeLike
Would you happen to have the raw data for this still, and would it be possible to get it off you? I’d like to look at a few things if possible.
Thanks
LikeLike
Yea sure, Ill send it after I get off work. And just FYI, I’m about a week away from repeating all the testing with a new version of the vapor polisher and (more importantly) with the plan to give the specimens more time to dry out.
LikeLike
[…] over at EngineerDog decided he has a good solution to the flaws found in acetone smoothing that have always existed […]
LikeLike
[…] EngineerDog on acetone vapor polishing and part strength: https://engineerdog.com/2015/05/04/effect-of-acetone-vapor-polishing-on-3d-printed-abs-parts/ […]
LikeLiked by 1 person
Hey, I’m curious why the conclusion seems to differ from this research: https://benchapman4.wordpress.com/2014/05/08/increasing-toughness-of-3d-printed-plastic-using-acetone-vapor/
LikeLiked by 1 person
Thank you for sharing this link! This brings up some very interesting issues worth discussing.
I reviewed his report and actually found little disagreement between our results, barring one discrepancy.
His figure 9 (avg ult strength) matches my conclusions very well! Both reports also observed that the depth of effect of acetone treatment was very shallow. Only the outermost layers were effected while insides were unchanged.
The one difference between then is what he ended up highlighting on the website presentation. He observed increased part “toughness” despite a loss of “strength”.
Toughness is the area under a stress-strain curve and is essentially strength times ductility. So he must have observed a huge increase in total displacement & % elongation (and he did as Fig 10 shows).
My tests showed essentially no difference in % elongation. All this makes me wonder if they had given their specimens enough time to dry after acetone exposure, which would have had this effect.
The other most likely source of this difference is our testing methods. My specimens were tested in bending and his in tension.
Since vapor polishing is a surface treatment I would have expected my method to be more sensitive to its effects.
(I should note that tensile modulus is not equivilant to bending modulus but they are usually reasonably close.)
LikeLike
Great, thanks so much!
LikeLiked by 1 person
I have found that acetone vapor created by heating the acetone penetrates the entire structure of the prints quickly (60 seconds) and makes for MUCH stronger finished components. I put hot water (~180 degrees) into a pan, enough acetone to just cover the bottom of a large beaker about 1mm thick then place the beaker into the hot water. No risk of ignition and most of the acetone remains to be poured back into its bottle. I can see the condensation on the side of the beaker as the level of vapor rises. When it is high enough I dip the part (suspended on wire or with an exacto blade stuck into the top surface) into the vapor for up to 60 seconds.
If you could send me your file or dimensions for your test part I would like to send you an untreated and treated part from my printer for you to stress test.
LikeLike
nice study. by chance, have you ever evaluated whether acetone vapor treatment will make a 3D ABS printed part more gas tight and if yes, up to what psi? Without any type of sealant or vapor treatment, ABS will generally leak a fairly low pressures (gas bubbles will randomly come out through out the part). There is a study out there that shows the effect of sealants (ie lacquers for wood, etc) to improve gas tightness, but not sure about the effect of acetone vapor treatment. I am curious if the other layer exposed to the acetone vapor “melts” to form a perfect gas seal but then again, not sure how much pressure it can take. I have an application that I want to prototype but need it to handle about 50-60 psi of pressure without pressure loss. thanks for any info
LikeLike
HI Patrick, sorry I have not studied its effects on pressure vessels and I would skeptical about this processes repeat-ability and reliability in that area. I cant recommend FDM 3d printing for use in any pressurized applications with or without any treatment. Air tightness is one thing but pressure = danger, 3d printed = variability, and FDM especially = layer separation. Machined parts would be the optimal solution.
That said, of course FDM is much cheaper than anything if you already own the machine so I see the temptation. I remember that the vapor treatment’s effect was much more shallow that I would have guessed so it would probably help to treat the inside and the outside of the vessel in question if you go that route.. If I had to try to make it would I would go for an epoxy coating instead.
LikeLike
Hi, have you checked the strength of a specimen with 100% infill?
Also, can you do a transparency test of a specimen made with ‘transparent’ abs, with 100% infill after vapour treatment? Imagine printable lenses.
LikeLike
My little machine doesnt have the power to test at high enough loads for 100% infill. Printed lenses is a neat idea though!
LikeLike
What a about using the aceton treatment for making 3d printed samples beter waterproof?
aan did you made a guide how to replicate your setup for aceton vapor threatment?
LikeLike
[…] performed by Michael Graham shows that acetone smoothing does indeed strengthen ABS parts by 31%. There’s a caveat though, […]
LikeLike